Horizontal Nav Bar

Friday, August 26, 2011

D.I.Y. Rodarte Barrette

At the moment, I'm in the process of growing out my bangs. Unfortunately, they're currently at the awkward length where they are too long to be bangs and too short to look intentional. I remember seeing the fabulous hair and barrettes at Rodarte's Spring 2011 show awhile back ago and being totally floored. They had such cool, laid-back 70's vibe to them that was so chic at the same time. At the time though, my shorter bangs were not conducive to the deep-part and barrette combo so my fascination fell to the wayside. Fast forward to now. My bangs are both long and driving me crazy. Luckily I remember the Rodarte barrettes and knew they'd be the perfect solution to my hair woes. Aside from the fact that I will sadly never be able to afford anything Rodarte, this was a necessary d.i.y. because I'm fairly positive they were only used for the runway show. Anyway, here's how I made my own version of the barrettes. Mine is not exactly the same since one of the pyrite beads I bought would not thread properly. So I improvised and I'm quite pleased with the results.

RODARTE BARRETTE D.I.Y.


Supplies Needed:

P8250138
1. A plain barrette. You can get a bag of them at a craft store from between $1-$3 depending on the size. Make sure they have holes on both ends that you can use to secure the wire.
2. Pyrite beads with holes drilled in them, preferably raw. Learned from my mistake and make sure the holes are large enough for the wire. You can also used any other type of bead. This is a very customizable d.i.y.
3. Gold wire. The gauge is up to you but I've found the thicker the wire the less give. This makes it harder to sculpt but it will maintain shape better.
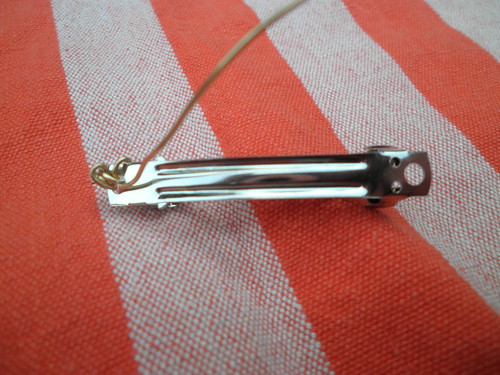
4. Round nose pilers (not pictured). You could do this without them but it would be more tedious and annoy.

Instructions
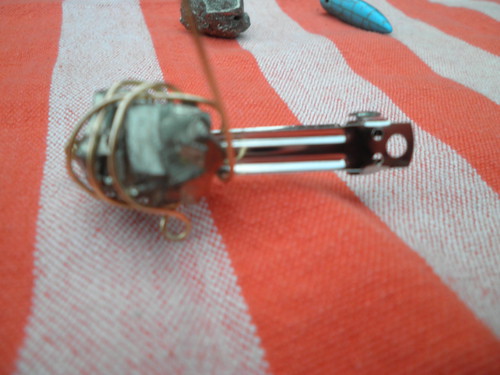
1. Wrap the wire around the whole about three or four times. On the last loop secure the end on the wire by pulling it through past loops. It should look something like this:

P8250139

2. Slide your first bead onto the wire. Push it as close to the end as you can. Wrap the wire about the bead and under the top part of the barrette several times. On your barrette you should be able to see a u-shaped piece of metal under the top piece. Make sure your wire goes between the top piece and the u-shaped piece so you hair will not get tangled with the wire when you wear the barrette. After the first bead the barrette should look somewhat like this:
P8250140

3. Continue the above step until all beads are secured to the barrette. End your barrette by securing the end of the wire the same way that began the barrette. Here is my end product:
P8250141

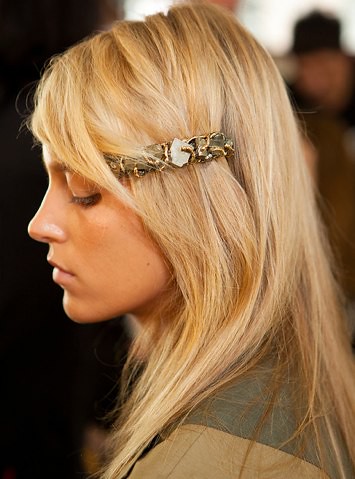
Although the turquoise bead doesn't exactly match the Rodarte version, I'm really pleased with how this turned out. I'm thinking of doing something similar with some druzy beads or maybe some amethyst.

Monday, August 22, 2011

White Walls


Two months ago I moved into my first solo apartment. Previously, I had been living in a house with six other girls, so decorating the house required few purchase since the lot of us pulled together our collected resources. Not to brag, but we had a really cute house for a bunch of undergraduates. Anyway, now that I am decorating on my own I'm suffering from the misfortune of blank walls. I love the stuff I already have, but these items were only decorating one small room and now I have a fairly large apartment to decorate. I think I'm going to start curating pieces a little bit at a time, since I don't want to break the bank doing it all at once. Here are some of the posters and prints that I've really been loving.

1. Hark! poster from Old Try : As an alum of Carolina, I think this poster is a great way to show some school pride without the usual, obnoxious NCAA licensed posters that are, quite frankly, to ugly and juvenile to have in any apartment that wants to appear remotely adult. This poster is a little pricey, but its handmade and totally worth the cost.


51XmpTdvcDL._SS500_

2. The Warrior's poster from Amazon: The Warriors is one of those cult films that lives up to its hype. In addition to being pure badassery, the movie looks amazing. Especially the outfits of all the gangs in the movie. I seriously might have to do a future post about fashion inspired by the film because is so much there to take inspiration from. Anyway, I also like this poster because its in Spanish and its smaller so its not as overwhelming as your usual movie poster.


Ann-Margret-1960s

3. Ann-Margret poster from All-Posters: This poster combines two things that I love. 1) A amazingly gorgeous and talented woman 2) 1960's sex kitten style. Also, the colors are just perfect. I need something to hang over my bed and I think this is pretty much perfect.


wrap_skl

4. Cavallini Skeleton wrapping paper from Touch of Europe:
Yes, this is a piece of wrapping. While $5 is a bit much to wrap a singular present, it is cheap price to decorate your walls. At the moment I have three Cavallini wrapping papers in my apartment. A garden (vegetables and fruits) one in my kitchen, their amazing phrenology poster in my dining area, and a vintage map of Paris above my dresser. I think this would make an amazing addition to my collection. You'll soon learn from my blog and future jewelry projects that I am obsessed with skulls/skeletons.
I'll update everyone if any of these actually make onto my walls
!

Thursday, August 18, 2011

Lanyard Bracelet D.I.Y.


So, remember those super awesome bracelets I featured yesterday and how I thought they would would make for an easy d.i.y. ? Well, I spent some time today making two of my own lanyard bracelets and while they were a bit time consuming (45 minutes for the small and an hour and a half for the double wrap) I was really pleased with how they turned out. Best part of all, the cost of supplies per bracelet was under $5. The only real investment was the time it will took to make the bracelets.
I was going to do a full on tutorial, but I forgot my camera so I could only photograph the end results. Plus, they are super simple to make. Anyway, here's a super abbreviated tutorial.


Materials Needed:
  1. A very simple toggle clasp, such as this one
  2. Jump rings of a similar finish, like these. Since you'll be working with a thicker type of string, a bigger jump ring is preferable.
  3. Plastic lace, like this. This stuff comes in every conceivable color, which is one of the reasons I like this d.i.y. so much. A small spool cost $1, so you could make a ton of different color combinations without breaking the bank.
  4. This website. I know it looks a bit silly, but this guy does a much better job of explaining lanyard making than I ever could. Plus, he has step-by-step pictures that are extremely helpful. Link
Instructions:
  1. Start with attaching a jump ring to the circular part of the toggle.
  2. Begin the braiding of your lanyard, as seen here. The only difference is that you will want to place the lanyard string as you see it in the first picture inside of the jump ring and make the beginning stitch so that it wraps around the jump ring.
  3. Continue making stitches until you reach your desired length. For this bracelet, you'll want to use circle stitches if you want your bracelets to resemble the ones from Noir. However, you could use any other stitch if you choose.
  4. TIPS FOR STITCHING: Make sure to pull the strings tightly and that your strings do not get twisted. This is important because you want a uniform look with your stitches.
  5. Once you reach your desired length, you will want to follow this pattern to knot the braid with slight modification. For the last string you close, place a jump ring on the string before looping it around the string on the left as described in the instructions.
  6. Attach the jump ring to another jump ring. Attach that jump ring to the t-shaped part of the toggle.
Now you're ready to wear your bracelet. Like I previously said, I really love these bracelets. They are a great take on the very hot summer-camp-cum-adult trend.
*When deciding the length for your bracelet, the trade-off for the long time it takes to make the double wrap bracelet is that it doubles for a necklace! Another bonus, the green bracelet also used glow-in-the-dark string, which makes it the perfect party bracelet.

Wednesday, August 17, 2011

Shaka Chan


When I think about jewelry brands that truly suit my aesthetic, Noir Jewelry always comes to mind. Whether it was the bedazzled faux-gauge earrings or glittering shark rings, they consistently kill it with their irreverent designs. Currently, I'm obsessing over their Shaka series of bracelets, seen above (click to view more). As someone who went to camp every summer as a kid and worked as a camp counselor for a few years, I have some fond memories of plastic lace and lanyards. Also, it is hard not to love something that reminds of this little nugget of gold below:


As much as I love these bracelets, they are a little steep for my current grad school budget considering I would want more than one. Plus, I love the idea of making once for myself, since I have not had a good excuse to lanyard since I quit doing day camp a few years ago. I'm smelling a future d.i.y., keep your eyes peeled!

Tuesday, August 16, 2011

Blame it on my Wild Heart

Before I venture too far into this whole blogging affair, let's get one thing straight: I love Stevie Nicks. Bad relationships and drug abuse aside, Nicks is a strong female that made a distinctive mark on the male-driven music scene with her incredible and unique voice. The fact that she is amazingly beautiful is merely the cherry-on-top.
The other day I informed a fellow Stevieophile about the below video of Stevie Nicks singing "Wild Heart" backstage at a Rolling Stone photoshoot. I don't really have to say much about the video, its speaks for itself rather beautifully.


I'm in love!

Blog Introductions

This is Ce Soir on Danse and you can call me Jules. This blog will be an amalgamation of all of my most passionate interests: music, fashion, d.i.y., movies, interior design, food, makeup/beauty, cats (I'm only somewhat joking). There might even be the occasional blathering about the going-ons of my graduate school experience. This blog is mainly for me, as in I'm doing it for the satisfaction of myself, but it would be wonderful if others chose to share in my passions. Welcome and, please, make yourself comfortable.
P.S. Keep an eye out for Ce Soir on Danse's store, which should be up and running within a month!